


FAQ
With the introduction of essential Security and Privacy features in macOS 10.14 Mojave and later, a number of Security and Privacy setting must be in place for our software to function correctly.
Our latest releases have been updated to incorporate these Security features, and will request the following permissions:
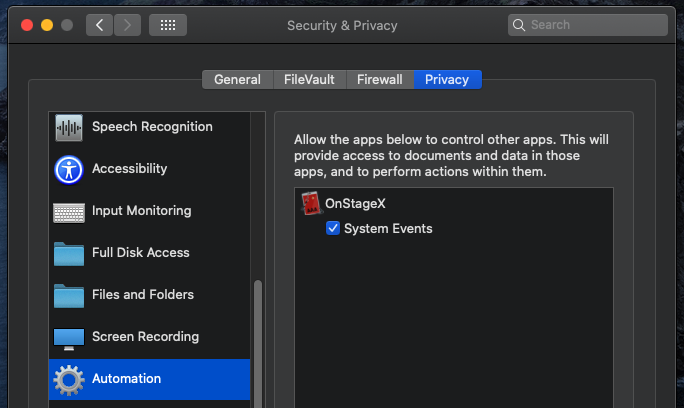
System Events
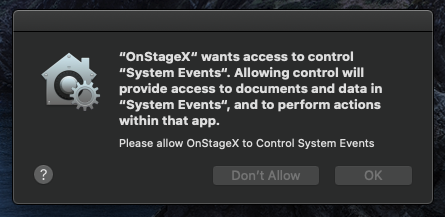
Allowing System Events will create an entry in System Preferences / Security and Privacy / Automation. Please allow our Applications to control System Events.
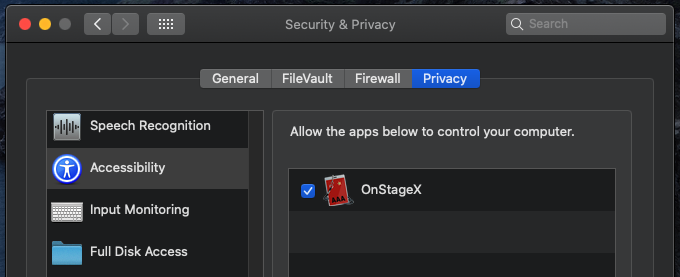
Accessibility
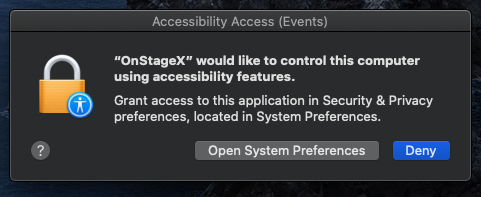
Allowing Accessibility features will create an entry in System Preferences / Security and Privacy / Accessibility. Please allow our Applications to control Accessibility features.
All latest releases have been Notarised by Apple to ensure Security and Privacy settings are safe for your system.
Next Memory Location Auto-load
Create a new Pro Tools MIDI track with Setlist Manager Virtual Port selected as the MIDI output. Any MIDI channel can be used.
Place any single Note On MIDI message on this track at the end of each location section to allow your Group to automatically cue up the next Memory Location in the Current Group.
The following Support videos show this in more detail:
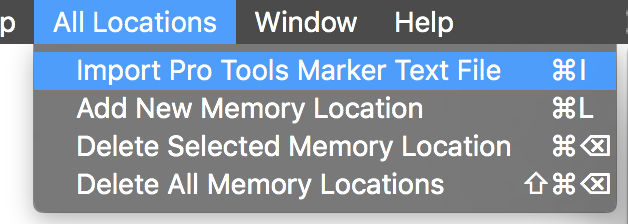
Import Pro Tools Memory Locations
Generate a Pro Tools text file containing all Memory Location information.
(Pro Tools : Windows/Memory Locations/Export markers as text)
Import Marker text file into Setlist Manager:
All Locations/‘Import Pro Tools Marker Text File’
Manually add Memory Locations
After importing your Pro Tools marker text file, additional Memory Locations can be added or removed manually using the All Locations menu items or table buttons.

Any Memory Location name and number can be edited with a double click. You will be notified if the Memory Location number is already in use.
Memory Location changes will be across all Groups.
Add LiveSets
We suggest configuring all your Ableton LiveSets before adding them to OnStageLive to prevent your Program Change messages from closing the current LiveSet.
Drag and drop LiveSets into the OnStageLive interface. LiveSets can also be added using the ‘Add New LiveSet’ menu item.
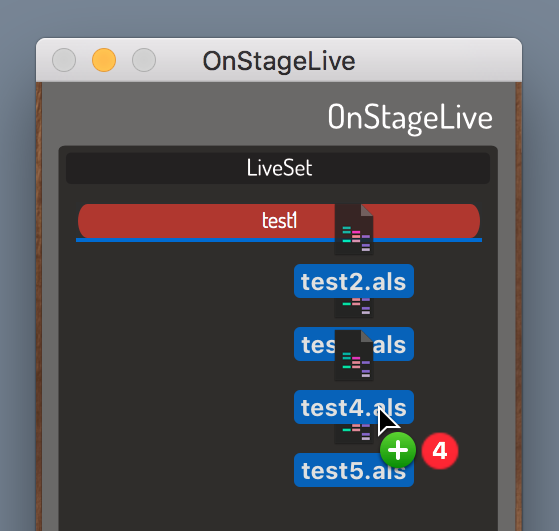
LiveSets can be rearranged to form your Setlist.
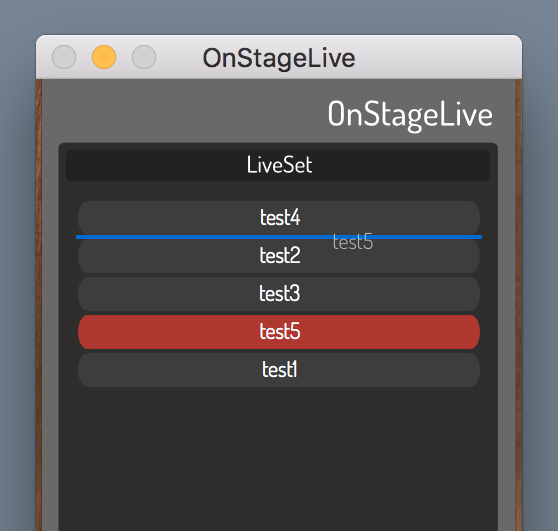
Use the minus interface button, delete key, or ‘Remove selected LiveSet’ menu item to remove LiveSets from your Setlist.
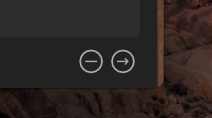
Use the arrow interface button, right arrow key, or ‘Go to selected LiveSet’ menu item to load the currently selected LiveSet.
Right click any OnStageLive LieSet to show the current file path.

If dialogue boxes aren’t dismissed, try gradually increasing the ‘Open Next LiveSet Delay’ in the OnStageLive Preferences.
Show Time!
With your Setlist in place, you are ready for your live performance.
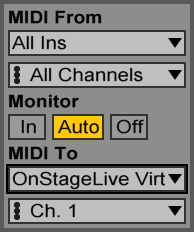
OnStageLive creates a virtual MIDI port for communication messages to be sent from Ableton Live.
Create a new MIDI track in each Ableton LiveSet intended to be used in your OnStageLive Setlist.
With OnStageLive running, select ‘OnStageLive Virtual Input’ as the MIDI To port for this track (any MIDI channel).
In each LiveSet, insert a new MIDI clip onto this track to load the next LiveSet in your OnStageLive Setlist.
Program this clip to send a 128 Program Change MIDI message on the OnStageLive Virtual Input port.

When you are at the end of your song, triggering this clip will tell OnStageLive to close the current LiveSet without saving changes, and load the next LiveSet in your Setlist.
Don’t forget to save your LiveSet with this Program Change MIDI track.
You are now ready to add LiveSets to the OnStageLive interface.
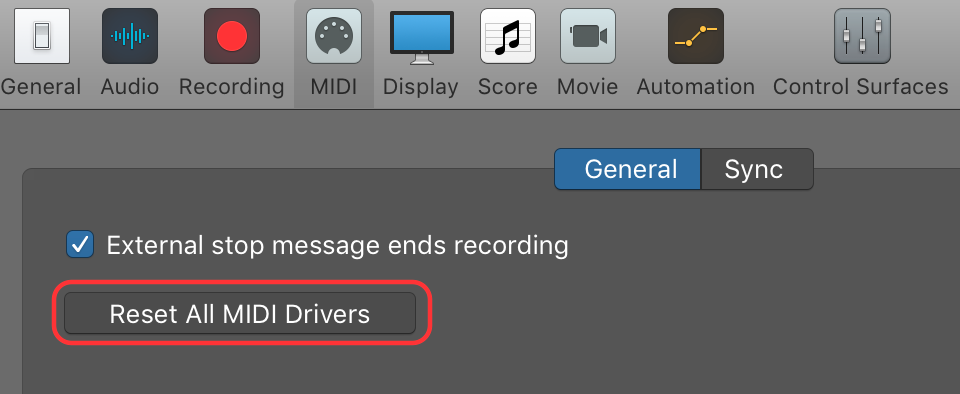
If OnStageX stops responding to the auto-load trigger, this is usually caused by Logic Pro X dropping the OnStageX Virtual Port.
To fix this go to the Logic Pro X Preferences/MIDI and click Reset All MIDI Drivers.
The OnStageX Virtual Port will reappear in the MIDI Output Port list.
This is usually caused by OnStageX being instructed to auto-load the next song twice.
Please check that MIDI Chase Program Change is switched off in all Logic Pro X Projects.
Our support video shows this in more detail
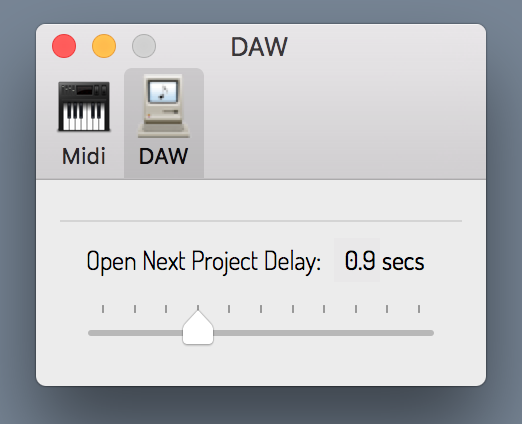
If there is a delay in closing the previous Project, we suggest gradually increasing the ‘Open Next Project Delay’ in the OnStageX Preferences.
Logic Pro X will allow you to assign any MIDI message to essential commands, such as Play From Beginning.
Goto the Logic Pro X main menu / Key Commands / Edit. Under Global Commands you will find Play From Beginning.
Click Learn New Assignment to assign this message to any MIDI device such as a keyboard MIDI Pad or MIDI foot pedal.
We suggest configuring all your Logic Pro X Projects before adding them to OnStageX.
Otherwise the Program Change messages will trigger OnStageX to close the current Project.
Add Projects
Please note: We suggest configuring all your Logic Pro X Projects before adding them to OnStageX to prevent your Program Change messages from closing the current Project.
Drag and drop Logic Pro X projects into the OnStageX interface. Projects can also be added using the ‘Add New Project’menu item.
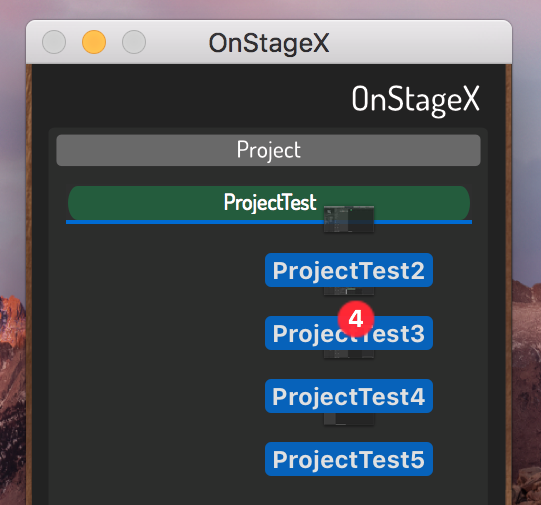
Projects can be rearranged to form your Setlist.
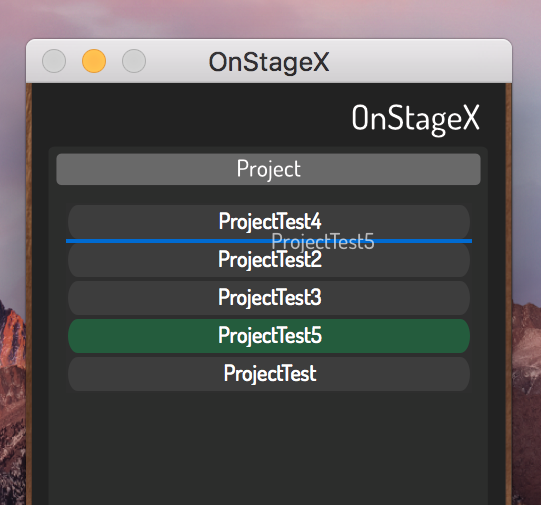
Use the minus interface button, delete key, or ‘Remove selected Project’ menu item to remove Projects from your Setlist.
Use the arrow interface button, right arrow key, or ‘Go to selected Project’ menu item to load the currently selected Project.
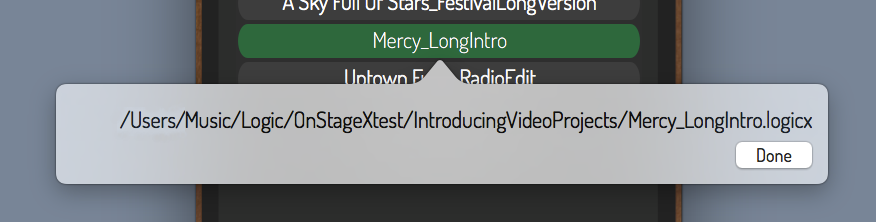
Right click any OnStageX Project to show the current file path.
If multiple Projects open, try gradually increasing the ‘Open Next Project Delay’ in the OnStageX Preferences.
OnStageX creates a virtual MIDI port for communication messages to be sent from Logic Pro X.
(Please ensure you are using Logic Pro X Version 10.0.7 or higher)
Create a new external MIDI track in each Logic X Project intended to be used in your OnStageX Setlist.
With OnStageX running, select ‘OnStageX Virtual Input’ as the output MIDI port for this track.
![]()
In each Project, insert a 127 Program Change MIDI message (any MIDI channel) on this communication track at the point at which you would like to close each Project and load the next in your Setlist.
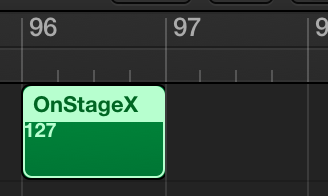
When your Project reaches this Program Change MIDI message on the Logic Pro X timeline, a message will be sent to OnStageX to close the current Project without saving changes, and load the next Project in your Setlist.
You might also wish to assign the Logic Pro X Global Key Command ‘Play From Beginning’ to an external MIDI device to start each Project when ready (foot pedal, MIDI controller surface etc.).
Please Note: To prevent OnStageX jumping down your Setlist by receiving multiple ‘next song’ messages, please ensure that Chase Program Change messages are switched off in every Project.
(Logic Pro X: File/Project Settings/MIDI/Chase/Program Change/unchecked)
Don’t forget to save your Logic Pro X Project with this Program Change track.
You are now ready to add Projects to the OnStageX interface.
Another huge TV Production uses Setlist Manager with Pro Tools, congrats to Sweden on their Eurovision win! 🥳
We’re delighted that Setlist Manager was used at this year’s Brit Awards!
Use code ‘fridayfeeling’ for 30% off all FluQe Software! Valid for 7 days..